Thursday, December 13, 2012

Top 5 Best And Useful Android Apps To increase Efficiency

Android and Google

Top 5 Best and Useful Android widgets(apps) For best Performance,productivity, efficiency and Enjoyment:
Android Platform Offers some of the features that iphone(iOs~Operating System) does not have.
These apps provides useful information to use android phone more efficient, The more likely you should download.

1.OnLive Desktop :
Android windows
A cloud version from Microsoft windows,gives you android tablet touch friendly , it offers basic windows access such as office and adobe reader. Learnmore

2 Google Maps:

Google map for android
Google Maps for android, Let you discover the world. The Planet, Learnmore

3.Battery Watcher:

This widget or apps let you see battery life. learnmore

4.TabletSmS:
TabletSMS lets you send and receive texts from your tablet – all using your phone number,learnmore

5.Google Chorme: Simple and Fast Browser by Google inc.
Get Google chrome for android here.

Friday, December 7, 2012

Blogger Settings Complete Tutorial To Optimize Blog For Best SEO Performance


Blogger Blogspot Settings Complete Tutorial And Explanation in Advance:
In this Post we will learn all about blogger settings and their features and how can we use it and get benefit from it.Blogger Settings are also helpful to optimize SEO for Best performance.

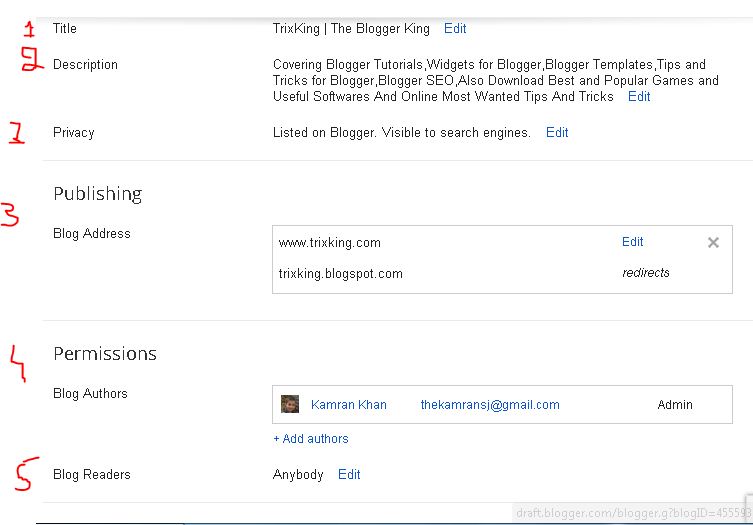
Let Start Tour : Login To Your Blogger Account and Click On Settings:
Blogger Settings Basics:
  1. Title: This is the Title of Your Blog.
  2. Description: This is the Description of Your Blog. Give a short details of your Blog. write what will you cover in your Blogging Career
  3. Privacy: Click on Edit. you will see. Add Your Blog to Our Listening : Select "YES", Let Search Engines find your Blog Select "YES".
  4. Publishing(Blog Address): Incase you want to point a custom domain for your Blog then you can use it, Otherwise ignore it.
  5. Permissions(Blog Authors): You can make someone to be your Blog author(Can only write posts,No Access to other sources such as template etc). You can make someone admin(can access everything)
  6. Blog Readers: click On edit and select Anybody. You may choose other option if you want your Blog to be private and no other one can access it.
Blogger Settings: Post And Comments:
  1. Show At Most: How much posts you want to be on the main page of your Blog.
  2. Post Template: Your Specific Text you want to be in post while writing new posts. 
  3. Showcase images with light box: Select Yes so that the images in Your Blog will open in light box,Select No, so that images will open in a new tab.
  4. Comments:Comments Location : How comments appear, either embedded or Full Page Or Pop-up window Or Hide.
  5. Who Can comment?: Anyone? Or Registered users? Users with Google accounts? Only members of this Blog? it's up to you which one you want.
  6. Comment Moderation: Always: Comments must be approved by Admin to be published, Sometimes: have options, Never: Comments published Does not need to be approved by administrator.
  7. Show word Verification: Yes: users must enter captcha code before they publish comments, No: user don't need to enter captcha code.
  8. Comment From message: your Message at the top of comment Box in Blogger.
Blogger Settings: Mobile And Email:
  1. Email: If you want to publish Posts Via Email then You can Use it.
  2. Comments Notification: If you have some friends who are supporting your Blog and you want that they be notified when someone comments in Your Blog. then you can enter their emails.
  3. Email Posts To: When you publish New posts the emails you entered their will receive that posts.
Blogger Settings Search Preferences:
  1. Meta Tags: Description: Use this feature if you want to have different meta tags for every posts.Learn How to Add Meta Tags In Blogger
  2. Error And Redirections: Custom Page Not Found:You can enter here a message which will come when the page in your Blog does not found. click on edit and enter message. Custom Redirects: use this feature if you want to redirect a post or a page to other page or post.
  3. Crawlers and indexing : If you don't know what it means then leave it, it is an advance feature.
Blogger Settings:Other

  1. Blog Tools: Export Blog: Get your all posts data in one xml file. import Blog: you can import your all blog posts if you have all the posts data in xml file. Delete Blog: If you want to delete your blog and all data.
  2. Site Feed: Allow Blog Feed Select YES, Post Feed Redirect URL: Enter Your Feed url, Click Here if you want to create feed for your Blog and Learn More about it
  3. Post Feed footer: Some text or codes you want to be appear at each feed.
  4. Enable Title Links And Enclosure Links:  This adds the title link and enclosure link options in the post editor. Title links allow you to set a custom URL for your post title. Enclosure links are used to make podcasts, MP3s and other content in your posts playable in feeds like RSS and Atom.
  5. OpenID: Your OpenID url:Your OpenID URL can be used to sign in to other OpenID enabled sites. You may also allow OpenID users to post comments on your blog by adjusting your Comment settings.
  6. 5: Select No( i am sure you know about it more than me)
  7. Google Analytics: Analytics Web Property ID: Enter Your Analytics Web property ID,You can find your Google  Analytics Web Property ID Here And Learn More about it Use Your Blogger or Gmail user name and passwords to Sign in.


From The Author: I hope this post will be helpful and useful for you, Incase you want more explanations of a topic in this post then you can comment.
Thank you!

Wednesday, December 5, 2012

Creating Designing And Managing Posts in Blogger Blogspot Blogs

 Creating Designing And Managing Posts in Blogger Blogspot Blogs
Blogger Tutorials : Creating ,Designing And Managing posts:
In the Previous Tutorials we learnt how to create blog,In this tutorial we will learn about posts and how to customize and Design posts and how to manage it.

How To Create Post in Blogger?:
  1. Login to your Blogger Dashboard
  2. Select a Blog or Click on Create New Post
New Post in blogger
  1. Write Your Post Title at the Top.
  2. And then Write Your Post.
  3. After writing Post You can Save as Draft, incase you want to write next time and don't want to publish
  4. Or You can Publish it, You can also Update next time.
How To Design Post in Blogger?:
Design posts in blogger

Blogger allows you to design post by using tools in blogger,
Now we will discuss these tools.
Blogger Posts Tools
  1. 1.Compose Mode: Write Your Post without coding in html,css
  2. HTML Mode: To Use HTML in order to do some changes and to Customize it.
  3. Undo: To go back,incase you did wrong.
  4. Redo: Revers of Undo,incase you want to go forward
  5. Font-Family: To Select font style.
  6. Fonts-Size: To Select size of Fonts for Post Text, You can select text and apply.
  7. Post-Format: just Like Ms word. Select either Normal,Heading,subheading,Minor heading or to go with normal text.
  8. Bold: To Bold Text. You can also use it by selecting text and apply.
  9. Italic: To Italic text. you can also use it by selecting some text and then apply
  10. Underline: To Underline Text. You can also apply by selecting text.
  11. StrikeThrough: Have a line in center of Text.
  12. Text-Color: Or Fonts color, Select text and apply
  13. Text-Background-color: Background of text.
  14. Link: Links to other external or internal pages. Select some text. Click on Link,a pop will appear, write url where you want to link and user go. you can also check or uncheck new tab. if you check the box then the page will open in new tab, if uncheck then it will open in the same window.
  15. Upload image: To Upload an image or images. You can Drag pictures to adjust.
  16. Upload Video: Upload video to your post. you can also use your youtube videos.
  17. Jump-Break: If you want to crop your post with read more text. you can use it. you can change read more text in blogger layout and then configure posts.
  18. Align Text: To align text either to right or left or center. you can also use it by selecting text and then apply.
  19. Number List: To create a list arranged with numbers
  20. Bullet List: To Create List arranged by bullets.
How To Manage Posts in Blogger?:
There are three ways and places where you can manage your posts. we will discuss it with details.
1.Post Settings: 
While writing post have a look at the right side.
You can label post, can change time and date of published posts,can use permalink for your post,can give location, By using Options button you can revoke users to comment on post and can manage backlinks.
posts settings in blogger
2.How to Configure Posts in Blogger?:
Go to Blogger Layout then click on edit posts.
a window will pop where you can configure posts.
posts settings in blogger
3. Blogger Posts.
Go To Your Blogger Dashboard then Select Posts.Now You can Select some posts and Assign Labels, You can Revert to Drafts.You can Delete posts.


From The Author: Dear Friends: i hope this post will help you and will be useful for you.
InCase you want more Or Something i missed. You can Comment. i will try to answer you and will give suggestions.

Friday, November 30, 2012

Best Blogger Templates 2013 Top 5 Chosen by TrixKing

Best Blogger Templates For 2013: As You know 2012 is going to be finished, Now we are going to publish all Blogger templates of 2013, I saw most of the bloggers including me, that change templates after some time. it may be any reason, including the template don't have the features they want, have no awesome look to represent a professional Blog, or it may be that when you want to care of users who read your blog are facing difficulties when reading or surfing on posts.

How to Select A Template for Blogger?: Depends on your contents(posts) you should select a template for your blog, following are some suggestions. 

Top 5 Blogger Templates:Previews are given for each template,Depending on your mind and the needs  of your users you can pick up a best template for your blog,Below are the best templates chosen by TrixKing | The Blogger King, 
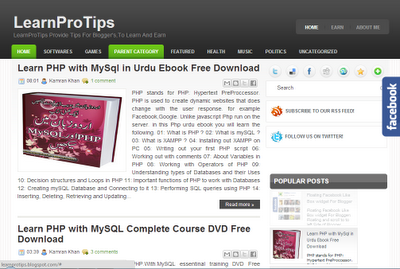
The Most Professional and Best Template| MBL Fresh Magazine Blogger Temlate
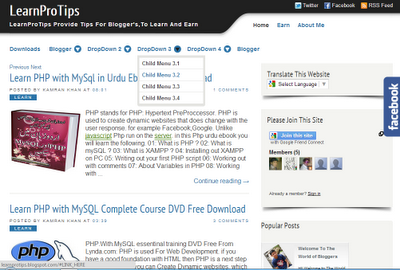
LearnProTips Template For Blogger
Simple Cool But Professional Template For Blogger
Best Blogger Template For Articles
Mash2 Blogger Template Adopted From Wordpress
Customized Thesis Blogger Template


Show Me More Blogger Templates | Browse All Blogger Templates

Do you want more? : Do you confused? which template is best for me?  which type of template you want? Ask from us. we will suggest you. 

Friday, November 23, 2012

Easy Method to Have image in Google Search Results


How to get image in Google Search Results: Google introduces For website owners and Bloggers to include the author picture in search results,which shows image from Google Plus profile.You can display your Profile picture also by following the steps in this post.You must be verified owner of your Blog or website to get it.what you need is to have Google plus profile and a photo.This method is also called by Google authorship markup.

How to image in Google Search Results?:
Follow below Steps.
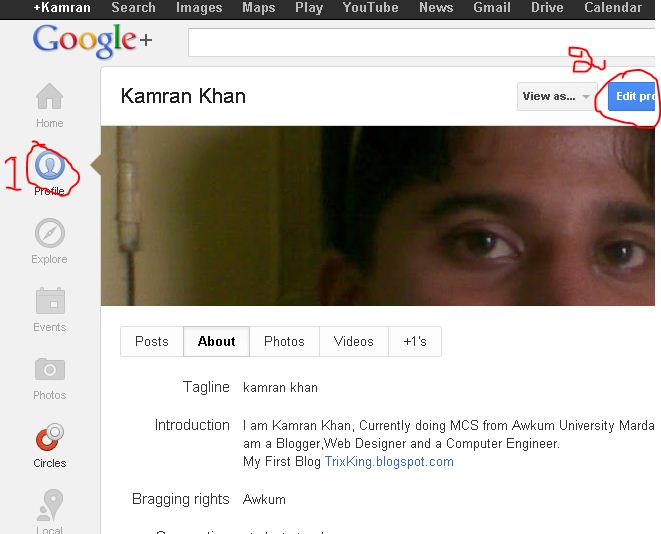
Step-1: Go To Your Google Plus Profile. Or Go To Google Plus and Click on Profile at the Left Side, Now Click on Edit Profile. See Below Screen shot for better understanding.
Now Click on the parts of your Profile to Edit. Scroll down and you will see Contributor to, Click that parts

Step-2: Click on Add Custom Link and insert your Blog or website url and Click Save. And then click on Done Editing at the Top.

Step-3: Go to Blogger Dashboard,Select a Blog. and Create about me page.
Now in the about me Page add your Google Plus Profile Link.
add the below Html code in HTML Mode.

<a href="https://profiles.google.com/102964393468355536945" rel="me">My Google Plus Profile</a>

Note: In the above code the red digit is your Google Plus Profile Id.
How to find my Google Plus id?:
Go To Google Plus and Click on Profile at the Left Side now at the address bar you will see your Google Plus id. See the below screen shot for better understanding. the underline red digits is your Google Plus id.
Save That About me Page.
Done! Now in a few days you will see your Google Plus profile image show up in Google search results.Peoples can also navigate to your Google Plus profile in serps. Peoples can also see how much you are circles if your circles are more than 100.

Not clear? Feel Free to comment and Ask.
Thank you

From The Author: Dear friends this post was a part of Blogger Tips and Tricks. we will publish more Blogger Tips and Tricks in upcoming days.


Monday, November 19, 2012

How To Disable Right Click on Blogger: Protect Blog Contents

Disable right click on Blogger and protect it from CopyCats
How To Disable Right Click in Blogger(Disable right mouse click Script): Do you want to protect your Blog posts to be copied?.Do you want your posts be unique and no one can't to copy your blog contents.The Optimum solution is to prevent others to copy your posts.and to disable right click on Blogger blogs. so that even if user select the text, they can't to copy it. because the right click will not work and also CTRL+C.
However if you are providing services for the Bloggers and users by giving them codes such as widgets,plugins. then it will be the drawback. however you can also get rid of this problem. then there is another method that you can use which allow users to copy codes just by pressing a javascript button.

How To Disable users to copy your posts?:
The Best way is to Disable right click on your blogs.
Follow the Below Steps To implement this technique on Your Blogger Blogspot Blog:
Step-1: Go Your Blogger Dashboard Select A Blog.
Step-2: Go to Layout of your Blog and Add A Gadget Select HTML/JAVASCRIPT
Step-3: Now Copy Below code and Paste.

<script language=javascript>
<!--
//Disable right mouse click Script
//By TrixKing Blog

var message="Function Disabled!";
///////////////////////////////////
function clickIE4(){
if (event.button==2){
alert(message);
return false;
}
}
function clickNS4(e){
if (document.layers||document.getElementById&&!document.all){
if (e.which==2||e.which==3){
alert(message);
return false;
}
}
}
if (document.layers){
document.captureEvents(Event.MOUSEDOWN);
document.onmousedown=clickNS4;
}
else if (document.all&&!document.getElementById){
document.onmousedown=clickIE4;
}
document.oncontextmenu=new Function("alert(message);return false")
// -->
</script>

Finally Save it and You are Done!
Now try to select some text in your Blog and you will see that right click does not works.
When you right click this message will Pop "function disabled".
Now if you want to change this text then change the text in above codes.
This Line : var message="Function Disabled!";

Monday, November 12, 2012

Mash 2 Blogger Template Adopted From WordPress Free For All


Mash2 Blogger Template Preview
Download |Preview(Screen Shot)

Mash2 (mashable inspired) Blogger Template Download And Review:
Mash2 Template is a Blogger Template and it is converted from wordpress. it is a free premium Blogger template with two columns, right sidebar, page navigation menu, ads slots ready, auto post summaries with thumbnails, social share buttons, related posts and footer columns. It has an excellent layout with professional look.After Reviewing this blogger template developers converted to blogger.
Features of This Blogger Template :

Menu Of Mash2 Template:
 Simple but professional menu provides more flexibility for the user to navigate to their desire Pages or Posts. you can configure it it easily in the Template HTML.
A New Way of Read More Style: With more posts on main page provides you more impression of your posts to get. the posts are crop in order to provide to users to pick their post easily which they like the most.

Mash2 Blogger Template Read More posts in a new style
Mash Template is designed to meet all needs of bloggers in order to increase page impression by displaying more posts in main page. you can also use it with labels. label some posts and put then in html mode you can give a name and url of that labels posts so that all the posts in the read more style will be shown. 
Social icons :
imesh2 social networking icons
There are 5 Social icons/subscribe buttons that provide convenience to the visitors to subscribe and get fresh updates for your upcoming new posts. twitter button let users follow you on twitter and recieve tweets, then there is facebook button through which users can easily be a fan of you on facebook and get updates in newsfeed.there there is Rss through which users can easily follow by email and get new posts via email, in other words can subscribe by email.Users can also send you an email for suggestions and feedback

How To Upload it in Blogger/Blogspot:

  1. Download the Template and extract it
  2. Go To Your Dashboard
  3. Click on A Blog and Then click On Template
  4. Now At the Top-Right you will see Backup/Restore Button.
  5. Click on it and then click on chose file and point the location where you saved the template
If you have any problem Regarding this template or Technical questions you can comment. we will try to solve your problems.