Thursday, December 27, 2012

How To Add Comment Count Below every Post Title in Blogger

Comment count box for blogger
Comments for a blog plays an important role, not just for users but also for the blog owners. For users it might be useful in case there are some update, or something wrong, user can troubleshoot their problems by reading the comments.For Blog owners also because it surely increase comments discussions.as well as Blog Traffic. how comments Increase Blog Traffic? we will publish a post about it.
Or
Features:
  • if the comments are 0. then the preview would be Be the First to comment otherwise it will show x Comments so far. 
  • By clicking on the link user will be taken directly to comment form.
  • Facility to customize the code of your desire liking.
  • .Comment Box icon. 

How to Add Comment count Box link in Blogger?:
Follow the below steps.

  1. Go to Your Blogger dashboard.
  2. Select a Blog and Click on Template.
  3. Edit HTML and proceed.
  4. Check the Box Expand widget
  5. Now Search for the Below code(Tip: CTRL+F)
<div class='post-header-line-1'>

Or This:

<data:post.title/>
        </b:if>
     </b:if>
      </h2>
    </b:if>

Tips:In case you can't to find the code just search the first line.and then look forward the remaining code.
Once you found the code. Just Below anyone of them Paste the Below code.

<span class='post-comment-link' style='Float:right;'>
        <b:if cond='data:blog.pageType != &quot;item&quot;'>
          <b:if cond='data:post.allowComments'>
            <a class='comment-link' expr:href='data:post.addCommentUrl' expr:onclick='data:post.addCommentOnclick' style='background:url(https://blogger.googleusercontent.com/img/b/R29vZ2xl/AVvXsEjIkWwQVsswXKWOhNzug6xGPbl3yHy9L56lJ4AsZnGxOOmNB5gAClkeovuZ1tvBlyUz8JdHlKDquRpksIS-5pg5OZQSkA_3IiDdpOBY6u8qyAJwS7i4BNEdTedi3eooiaFYAF38MdC40beW/s400/icon_comments.png) no-repeat;Padding-left:20px;'><b:if cond='data:post.numComments == 0'>Be the first to comment!<b:else/> <b:if cond='data:post.numComments == 1'><data:post.numComments/> Comment so far<b:else/><data:post.numComments/> Comments so far</b:if> </b:if></a>
          </b:if>
        </b:if>
      </span> 

Finally Save Template and Your are Done!
Customization:
You can change the red text at the above codes. first one is the url of comment box icon. if you want to change it. simple replace the url you want. You can change the text Be the first to comment to something else. just replace the text with your own text. you can also change Comment so Far Text. just replace both with your own.
If you are facing any difficulties Feel Free to Comment and Ask.

Monday, December 24, 2012

How To increase Blog Traffic in Just A Week

Blog Traffic
How to increase blog or Website Traffic in a just a week?:
World wide web is full of tips and tricks to increase Traffic(visitors) to your site, Most of them referring social sites to increase or improve traffic, which is not consistent for long term,In this post i will share some core methods to increase site traffic, Before you think about increasing traffic, learn know how search engines pick up contents .

You Must to Read in order to write:
Read Blogs
Want to be a professional Blogger? then start reading, learnt from +Mairaj Pirzada: a nice guy,who love to write, one thing i noticed in him is he read out the most, and thus growing a pro writer. Read which is most interested to you, Keep reading until you finish, Have a schedule of reading, heard from my respectable teacher, Ashraf Zia Read everyday at least 15 pages a day and make it your habit.

Write which is the Most wanted:
Think for a while, there might be some ideas which is most useful to others, but you didn't published yet,
write most wanted
In the above screen shot you can see 3 posts,  one of which have 5x most views of 1964, Keep this mental picture in your mind, and start publishing.

Merge ideas of different Bloggers:

Merge blog ideas

As i said You must to read in order to write, It does not mean that you read one blog and adopt his styles, Read different type of Blogs, Create ideas by merging them in one,Have look on their site, how they put contents,which is the most same adopt it.

Use Social Networks But not for Long term:
Traffic from social networks are not for long term, The consistent way is to bring traffic from search engines(Google is the Best), Submit your site map to Google , Increase social activities by adding social networks buttons, Below Post title will be the best. Once your Blog become popular, peoples will share your contents on social sites Not you.

Don't waste time on Ranking:
Alexa Ranking? Do'nt dude
just saw many Bloggers and site admins, most of the time they spending by increasing page rank and improving alexa rank. Alexa is just a concept, concentrate on visitors, However it is good if you want to attract advertisers to advertise on your site. Learn How to boost alexa ranking, publish quality contents which produce useful results.

Conclusion: This post was just a part of some ideas to increase traffic( Picture abi Baki he mere Dost), you must to learn such ideas from others Blogs and thus merge it and create the one which will be the best.

Friday, December 21, 2012

How To improve Alexa Ranking in One Week

How to improve Alexa ranking fast in one week: 
Alexa is an web information company that rank websites and Blogs according to their visitors and some other factors, Advertisers are looking for best ranking sites to promote their product, and thus everyone is looking for techniques and tips to improve their alexa ranking. There are some techniques that can increase alexa ranking, one of which is natural, which is traffic based and content quality while the other one is that you can adopt to improve increase your alexa ranking. Through out this post i will provide some most popular tips and core methods to increase(improve) alexa ranking.

1. Install Alexa Toolbar:  
By installing alexa toolbar you can surely improve your alexa ranking, it will be more awesome if your friends who are visiting your site also installed it.
Get Alexa Toolbar here

2.Get Alexa Widget installed on your site:
Placing widget on your blog or website is an older and best way to improve alexa ranking easily.
Get Alexa widget for your site here

3. Ask friends to review Your site:
First of all review your site by yourself then also tell your friends to review your site, it will surely improve alexa ranking.
Review TrixKing Blog

4.Get Backlinks From other sites:
The most easiest way to get backlinks is to comment on wordpress blogs who have enabeled comment luv. also on blogger blogs who enabled name and urls.
if your site is linked in other site it will improve alexa ranking as well as your site rank in google, more chances of your contents to appear at the top in search results. Learn How Google pick contents

5. Claim Your site on Alexa Site:
Create an account on alexa site, and claim your site, first you have to verify you are the admin of your site, you have two options one of which is to verify by meta tag for blogs while other is to upload file to your site, Get alexa account here

Other Tips to improve alexa ranking: Write regularly posts and update your site or blog. share your post on social networks such as facebook,twitter, Google Plus, Pinterst , etc.

By Applying the above methods i am sure you will see your alexa rank improved within One week.

Wednesday, December 19, 2012

How To Activate Google Analytics For Blogger Blogspot

Google Analytics Logo

How to Activate Google Analytics for Blogger Blogspot Blogs:
Google analytics is a product of Google which allow you to analysis your blog traffic or visitors, Now with Gmail account you can also access this product. Don't have? Create one Free here, if you did not yet used Google analytics i recommend you to try it now. this tutorial will help you to install google analytic code on your blog, You can also used it for website

Follow the Below simple Steps:

  1. Go To Google Analytics , Click on Sign in and use your Gmail user name and password to sign in. if you already "sign in" in chrome. It will take you automatically to Main Page.
  2. Now see the below screen shot, click on Admin at the Top right and then click on Create + New account Create Google analytic account for blogger
  3. Now Fill the form, write your site name,website url, industry category,Time zone, select your country, and Account Name(which will let you to differentiate,incase you want to use Google analytics for more than one Blog)

Google analytic form
After filling the form click on Get Tracking ID, A window will pop up, Click on I ACCEPT.
Getting Tracking ID and Code to paste in Blogger
Now give me attention here. There are two things you have to do Now.See the Above screen shot.
  1. Go to Blogger Dashboard then layout and then add gadget, select HTML/Javascript , Copy the Tracking code and paste and Save.
  2. Now At the above Screen shot You can see Your Tracking ID, Copy it, Go to Blogger Settings then click on Other and paste your Google Tracking ID there. And click Save settings at the top right.
To paste Google analytic Tracking ID at Blogger settings > Other
Finally Click On Save at the Google Analytics Site.
Now if you done all the steps correctly You will see Tracking Code installed. 

Dear Friends: if you have any problem while enabling google analytics for Blogger, Then comment on this post, i will Reply you with suitable answer.
Thank you

Monday, December 17, 2012

[Giveaway] FREE License Keys of iStonsoft ePub Converter

[Giveaway] FREE License Keys of iStonsoft ePub Converter
iStonsoft ePub Converter
[Freebies] FREE license key of iStonsoft ePub Converter:
EPUB is a kind of open digital library standards, EPUB file can read in portable e - ink equipment, mobile phone and desktop computer. There are many ebooks on line are the ePub format, most of ebooks readers support ePub format! But we know there are still a lot of ebooks are in other formats like: MOBI, word, PDF, text and html. But today I will give 7 keys of iStonsoft ePub converter to our users.
iStonsoft ePub Converter is A useful tool to create ePub books and accomplish you ePub format conversion perfectly!
iStonsoft ePub converter Features: 
  • Build an eBook by converting multiple formats to ePub: Word to ePub, PDF to ePub, Text to ePub, HTML to ePub, MOBI to ePub, etc.
  • Batch convert more than one file to ePub at one time.
  • Preserve all the text, columns, tables, images, graphics, hyperlinks, layouts in the imported files.
  • Output the standard eBook format compatible with most popular e-Readers.
Platform: Windows NT4/2000/2003/XP/Vista/7, Windows 8
With this ePub converter free full version software, you can read any of your ebooks on any readers:
  • Apple iPad/iPad 2/the new iPad (using iBooks)
  • iPhone and iPod touch (using Lexcycle Stanza, Glider or iBooks on iOS 4.0+)
  • Sony Reader
  • Android devices (using WordPlayer, FBReader, Aldiko)
  • Barnes & Noble Nook Color, Nook Tablet, Nook Simple Touch
  • Hanlin eReader
  • BeBook
  • iriver Story HD
  • Bookeen Cybook Gen3, Cybook Opus
  • iRex Digital Reader 800, 1000
  • PocketBook Reader
  • Ctaindia's eGriver Ebook Reader

How to get license key:
Today iStonsoft has a give away with free full license key of PDF Password Remover for readers. To grab the license key just do:Today I will give 7 keys of iStonsoft ePub converter

- Like iStonsoft Facebook Page Click Here (MUST)
- Share this post to Social network as: Facebook,Twiter,Pinterest,+1  (MUST)
- Leave a comment (with your valid email) (MUST)

Next time: we will launch the second giveaway of iStosoft PDF converter, please attention!
-->

Thursday, December 13, 2012

Top 5 Best And Useful Android Apps To increase Efficiency

Android and Google

Top 5 Best and Useful Android widgets(apps) For best Performance,productivity, efficiency and Enjoyment:
Android Platform Offers some of the features that iphone(iOs~Operating System) does not have.
These apps provides useful information to use android phone more efficient, The more likely you should download.

1.OnLive Desktop :
Android windows
A cloud version from Microsoft windows,gives you android tablet touch friendly , it offers basic windows access such as office and adobe reader. Learnmore

2 Google Maps:

Google map for android
Google Maps for android, Let you discover the world. The Planet, Learnmore

3.Battery Watcher:

This widget or apps let you see battery life. learnmore

4.TabletSmS:
TabletSMS lets you send and receive texts from your tablet – all using your phone number,learnmore

5.Google Chorme: Simple and Fast Browser by Google inc.
Get Google chrome for android here.

Friday, December 7, 2012

Blogger Settings Complete Tutorial To Optimize Blog For Best SEO Performance


Blogger Blogspot Settings Complete Tutorial And Explanation in Advance:
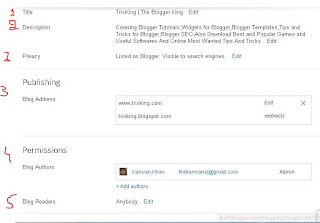
In this Post we will learn all about blogger settings and their features and how can we use it and get benefit from it.Blogger Settings are also helpful to optimize SEO for Best performance.

Let Start Tour : Login To Your Blogger Account and Click On Settings:
Blogger Settings Basics:
  1. Title: This is the Title of Your Blog.
  2. Description: This is the Description of Your Blog. Give a short details of your Blog. write what will you cover in your Blogging Career
  3. Privacy: Click on Edit. you will see. Add Your Blog to Our Listening : Select "YES", Let Search Engines find your Blog Select "YES".
  4. Publishing(Blog Address): Incase you want to point a custom domain for your Blog then you can use it, Otherwise ignore it.
  5. Permissions(Blog Authors): You can make someone to be your Blog author(Can only write posts,No Access to other sources such as template etc). You can make someone admin(can access everything)
  6. Blog Readers: click On edit and select Anybody. You may choose other option if you want your Blog to be private and no other one can access it.
Blogger Settings: Post And Comments:
  1. Show At Most: How much posts you want to be on the main page of your Blog.
  2. Post Template: Your Specific Text you want to be in post while writing new posts. 
  3. Showcase images with light box: Select Yes so that the images in Your Blog will open in light box,Select No, so that images will open in a new tab.
  4. Comments:Comments Location : How comments appear, either embedded or Full Page Or Pop-up window Or Hide.
  5. Who Can comment?: Anyone? Or Registered users? Users with Google accounts? Only members of this Blog? it's up to you which one you want.
  6. Comment Moderation: Always: Comments must be approved by Admin to be published, Sometimes: have options, Never: Comments published Does not need to be approved by administrator.
  7. Show word Verification: Yes: users must enter captcha code before they publish comments, No: user don't need to enter captcha code.
  8. Comment From message: your Message at the top of comment Box in Blogger.
Blogger Settings: Mobile And Email:
  1. Email: If you want to publish Posts Via Email then You can Use it.
  2. Comments Notification: If you have some friends who are supporting your Blog and you want that they be notified when someone comments in Your Blog. then you can enter their emails.
  3. Email Posts To: When you publish New posts the emails you entered their will receive that posts.
Blogger Settings Search Preferences:
  1. Meta Tags: Description: Use this feature if you want to have different meta tags for every posts.Learn How to Add Meta Tags In Blogger
  2. Error And Redirections: Custom Page Not Found:You can enter here a message which will come when the page in your Blog does not found. click on edit and enter message. Custom Redirects: use this feature if you want to redirect a post or a page to other page or post.
  3. Crawlers and indexing : If you don't know what it means then leave it, it is an advance feature.
Blogger Settings:Other

  1. Blog Tools: Export Blog: Get your all posts data in one xml file. import Blog: you can import your all blog posts if you have all the posts data in xml file. Delete Blog: If you want to delete your blog and all data.
  2. Site Feed: Allow Blog Feed Select YES, Post Feed Redirect URL: Enter Your Feed url, Click Here if you want to create feed for your Blog and Learn More about it
  3. Post Feed footer: Some text or codes you want to be appear at each feed.
  4. Enable Title Links And Enclosure Links:  This adds the title link and enclosure link options in the post editor. Title links allow you to set a custom URL for your post title. Enclosure links are used to make podcasts, MP3s and other content in your posts playable in feeds like RSS and Atom.
  5. OpenID: Your OpenID url:Your OpenID URL can be used to sign in to other OpenID enabled sites. You may also allow OpenID users to post comments on your blog by adjusting your Comment settings.
  6. 5: Select No( i am sure you know about it more than me)
  7. Google Analytics: Analytics Web Property ID: Enter Your Analytics Web property ID,You can find your Google  Analytics Web Property ID Here And Learn More about it Use Your Blogger or Gmail user name and passwords to Sign in.


From The Author: I hope this post will be helpful and useful for you, Incase you want more explanations of a topic in this post then you can comment.
Thank you!

Wednesday, December 5, 2012

Creating Designing And Managing Posts in Blogger Blogspot Blogs

 Creating Designing And Managing Posts in Blogger Blogspot Blogs
Blogger Tutorials : Creating ,Designing And Managing posts:
In the Previous Tutorials we learnt how to create blog,In this tutorial we will learn about posts and how to customize and Design posts and how to manage it.

How To Create Post in Blogger?:
  1. Login to your Blogger Dashboard
  2. Select a Blog or Click on Create New Post
New Post in blogger
  1. Write Your Post Title at the Top.
  2. And then Write Your Post.
  3. After writing Post You can Save as Draft, incase you want to write next time and don't want to publish
  4. Or You can Publish it, You can also Update next time.
How To Design Post in Blogger?:
Design posts in blogger

Blogger allows you to design post by using tools in blogger,
Now we will discuss these tools.
Blogger Posts Tools
  1. 1.Compose Mode: Write Your Post without coding in html,css
  2. HTML Mode: To Use HTML in order to do some changes and to Customize it.
  3. Undo: To go back,incase you did wrong.
  4. Redo: Revers of Undo,incase you want to go forward
  5. Font-Family: To Select font style.
  6. Fonts-Size: To Select size of Fonts for Post Text, You can select text and apply.
  7. Post-Format: just Like Ms word. Select either Normal,Heading,subheading,Minor heading or to go with normal text.
  8. Bold: To Bold Text. You can also use it by selecting text and apply.
  9. Italic: To Italic text. you can also use it by selecting some text and then apply
  10. Underline: To Underline Text. You can also apply by selecting text.
  11. StrikeThrough: Have a line in center of Text.
  12. Text-Color: Or Fonts color, Select text and apply
  13. Text-Background-color: Background of text.
  14. Link: Links to other external or internal pages. Select some text. Click on Link,a pop will appear, write url where you want to link and user go. you can also check or uncheck new tab. if you check the box then the page will open in new tab, if uncheck then it will open in the same window.
  15. Upload image: To Upload an image or images. You can Drag pictures to adjust.
  16. Upload Video: Upload video to your post. you can also use your youtube videos.
  17. Jump-Break: If you want to crop your post with read more text. you can use it. you can change read more text in blogger layout and then configure posts.
  18. Align Text: To align text either to right or left or center. you can also use it by selecting text and then apply.
  19. Number List: To create a list arranged with numbers
  20. Bullet List: To Create List arranged by bullets.
How To Manage Posts in Blogger?:
There are three ways and places where you can manage your posts. we will discuss it with details.
1.Post Settings: 
While writing post have a look at the right side.
You can label post, can change time and date of published posts,can use permalink for your post,can give location, By using Options button you can revoke users to comment on post and can manage backlinks.
posts settings in blogger
2.How to Configure Posts in Blogger?:
Go to Blogger Layout then click on edit posts.
a window will pop where you can configure posts.
posts settings in blogger
3. Blogger Posts.
Go To Your Blogger Dashboard then Select Posts.Now You can Select some posts and Assign Labels, You can Revert to Drafts.You can Delete posts.


From The Author: Dear Friends: i hope this post will help you and will be useful for you.
InCase you want more Or Something i missed. You can Comment. i will try to answer you and will give suggestions.